Ever seen a deck that looks fine until you step on it? That’s what we found here. From a distance, it seemed okay. But up close, the problems were clear. The stairs felt shaky. The boards were cracked and uneven. The railing moved with the lightest touch. It wasn’t just worn out. It was unsafe.
The homeowner asked for something simple, a safer, cleaner space. We got to work with one goal: bring new life to this outdoor area without starting from scratch. This was a deck rehab project, not a full rebuild. We kept the strong parts, removed the weak ones, and made every update count.
At One Clearwater Construction, we take pride in doing things right. Our team followed the code, stayed on plan, and handled every detail with care. This deck rehab project turned a tired, risky deck into a space that feels solid, looks fresh, and works better every day.
Why Deck Rehabs Matter
Decks are where life happens outside. Families gather. Kids play. Friends hang out by the pool. It’s one of the most-used spots around any home. But when a deck starts to wear down, it doesn’t just lose its looks. It becomes a safety risk.
Aging Decks Can Hide Real Problems
Old decks often hide serious issues. Boards may look fine until they crack under pressure. Nails loosen. Railings shake. Stairs tilt or sink. These problems can cause accidents, and they don’t always show up right away. That’s why checking your deck often and making early upgrades matter.
More People Are Upgrading Than Ever
People want fresh air, room to relax, and safe places for their families. That’s why deck upgrades are rising. A solid, well-built deck adds comfort now and value later. It’s also one of the top features buyers look for in warm areas. In fact, in 2024, 14% of homeowners tackled deck projects, making decks the most common outdoor structure upgrade of the year.
Smart Fix, Full Rebuild or Something In Between
You don’t always need a full teardown. Sometimes, a few smart upgrades, like new stairs or railings, are enough to improve safety and extend your deck’s life.
Other times, the damage runs deeper. If the structure itself is compromised, a full rebuild may be the safest option.
But there’s also a middle ground — the path we took on this project. We replaced the entire joist system while keeping select support elements that were still strong and up to code. This hybrid approach balanced cost, safety, and structural integrity, without starting completely from scratch.
Whether it’s a simple fix, a partial rebuild, or a total overhaul, the goal is always the same: safety, strength, and a clean finish that lasts.
We Build Decks the Right Way
At One Clearwater Construction, we follow the same steps every time. We check the code and follow local municipality requirements that align with the Florida Building Code. We use strong structural supports and the right tools. We plan each step before we build. That’s how we deliver decks that feel solid and last long.
When you walk on one of our decks, you can feel the care we put into it. That’s what makes the difference.
What We Saw on Day One

The first look said it all. The deck was made of rotting wood from top to bottom — stairs, railing, and posts. After years of sun, rain, and use, it had faded to a tired grey. There were no coatings or modern materials. Just old lumber, dried out and uneven.
Unsafe from the Start
As we walked around, the issues stood out clearly:
- Railings were loose and shaky
- Stairs leaned slightly and felt soft underfoot
- Boards were splintering and uneven
- Nails and screws had rusted over
- Gaps between boards had widened over time
The entire structure felt aged. It didn’t meet safety standards and wasn’t comfortable for everyday use, especially around a pool deck where people walk barefoot.
More Than Just a Quick Fix
It wasn’t just about making it look better. This deck needed real changes. The stairs were misaligned. The posts weren’t set evenly. The underside was cluttered and messy. A few repairs wouldn’t make it safer — or worth keeping.
We knew right away this had to be a full rebuild. Something clean, strong, and built to code. And that’s exactly what we planned next.
Step-by-Step: How We Did This Deck Rehab
This deck rehab project was all about doing things the right way. We didn’t just make it look better — we rebuilt it from the ground up. From the first tear-down to the final railing, every step was planned, measured, and built to code. Here’s exactly how we transformed this backyard space, one step at a time.
Step 1: Tear Down and Prep

We began by removing the old deck piece by piece. The boards were worn, the rails were shaky, and the screws were rusted. It was time to let it go.
- Removed floorboards, railings, stairs, and posts
- Removed the entire joist system, all supporting hangers, and fasteners to start clean
- Took out all rusted screws and bent nails
- Worked carefully to avoid damage to the house
- Cleared every piece to make room for a solid rebuild
We didn’t just rush it. A clean tear-down helps the whole project go smoother. So we stayed organized the whole way through.
Checking What We Could Keep
Before tossing everything, we inspected the base structure. Some of it was still strong. That meant we didn’t have to rebuild from scratch.
- Tapped each beam to check for rot
- Replaced anything that felt weak or loose
- Saved time and budget by reusing what made sense
Keeping strong parts helps, but we never cut corners. If it wasn’t 100% safe, we took it out.
Planning the New Layout

Once we had cleared the old materials, we moved on to layout planning. We wanted the deck to look clean, feel sturdy, and meet every code requirement. Every line mattered at this stage, so we double-checked all measurements before moving forward.
- Marked space for the new stairs and railing posts
- Measured railing spacing for cable lines (4 inches apart)
- Double-checked stair rise and run: 7 inches tall, 11 inches deep
- Placed posts every 4 feet to follow the code and support the railing tension
- Set deck joists 16″ on center (OC), tied into the house foundation with joist hangers, and connected to rim joists using hurricane straps
- Checked that the post placement worked with the wire tension system
We finished by clearing the worksite, organizing materials, and setting up tools for the next phase. At this point, the plan was clear and the deck structure was ready to take shape.
Step 2: Structure and Stair Framing

We started by laying out a new deck base. This is the part that holds everything up, so it needs to be strong and level.
- Used pressure-treated wood for durability
- Added new joist hangers and hurricane straps for wind resistance loads
- Checked every board before using it
- Cut and set beams to match the new design
- Made sure the layout followed local building codes
Every part had to fit right. We took our time to double-check each cut and screw. A strong base makes the whole deck last longer.
Anchoring to the Ground
Next, we made the whole thing rock solid by connecting it to the concrete.
- Used Simpson Strong-Tie anchors for secure hold
- Drilled deep into concrete for bolt placement
- Tightened every fastener by hand
- Tested for movement and tightened again where needed
These anchors stop the deck from shifting or leaning. Even in bad weather, it’s not going anywhere.
Building Safer, Stronger Stairs
The old stairs didn’t feel right. The rise and run were uneven, which made them hard to use and unsafe. We rebuilt them to code and made sure every step felt solid underfoot.
- Built new stringers using the 7×11 code (7″ rise, 11″ run)
- Rechecked the layout to ensure the base landed flat and level
- Secured stair framing with galvanized bolts at every post
- Used #8 and #9 exterior wood decking screws to fasten each step
- Reinforced each tread with extra screws to prevent movement
We also lined up the stair base to connect smoothly with the new landing. Now, the stairs are not only safer but also match the clean look of the rest of the deck.
Getting Ready for the Top Work
Before wrapping this step, we cleaned up and checked the entire frame.
- Walked every joint to test strength
- Marked post spots for railing install
- Cleared sawdust and tools for safety
- Did a full structure check before moving on
Once the stairs and frame were finished, we knew we had a solid base. Next came the railing and final touches.
Step 3: Railings and Final Touches

The old railing was bulky and loose. We replaced it with a clean, modern system that’s safer and easier on the eyes.
- Installed white-painted railing posts
- Used wire balusters with 4-inch spacing (code-approved)
- Secured each post with strong brackets
- Pulled wire lines tight and level across the deck
This design keeps the space open. You can see the pool and yard without anything blocking the view. It also adds a fresh, polished look.
Finishing the Deck Surface
With the structure solid and the railings up, it was time to finish the deck boards.
- Trimmed all boards to fit cleanly at the edges
- Smoothed sharp corners to make them safe for bare feet
- Checked every screw to make sure it was tight
- Cleaned the surface of sawdust and debris
Every piece had to look neat and feel strong. No boards wobbled. No screws stuck out. The goal was a space that feels just as good as it looks.
Final Safety Walk and Checks
Before calling it done, we walked through every part of the deck.
- Tested all railing posts for strength
- Sanded the railing for safety with hands, caulked joints and painted to finish
- Stepped on every stair to check the movement
- Looked under the deck for missed fasteners
- Cleaned up tools, scraps, and packaging
We also made sure the landing area and base were free of gaps or trip hazards. That last walk-through matters. It helps us catch any small issues before we hand the project over.
Ready to Enjoy
The finished deck feels solid and open. The stairs are safe. The railing is strong. And the whole space looks brand new.
This is the part we love most — seeing everything come together. From old wood to a clean, safe outdoor space, the transformation was complete.
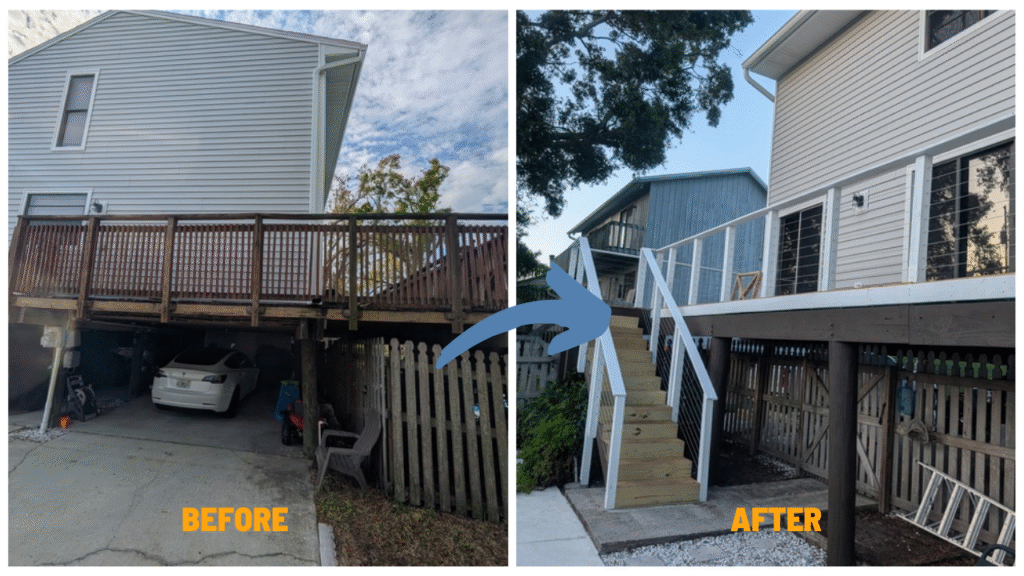
Before and After: A Whole New Look

From Worn Out to Fresh and Clean
The transformation was clear the moment we stepped back. What started as a tired, all-wood deck became a clean and modern outdoor space. The before pictures showed dark wood, leaning stairs, and bulky railings. The after view told a better story.
Open Railings, Better Views
We replaced the heavy wood railing with a sleek cable system. This change opened up the view and made the space feel larger. It also added a safer, cleaner finish. The new posts were painted white, creating a sharp contrast with the natural-colored deck boards.
Stronger Stairs and More Space
The old stairs were steep and uneven. Now, the rise and run feel smooth underfoot. Each step is level, sturdy, and built to code. You can walk up and down without a second thought. The new layout also gives the deck more usable space. There’s room to sit, move, and enjoy.
Designed to Match the Home
We made sure the final look matched the home. The white railing ties in with the house’s exterior. The wood tones stay soft and natural, blending with the pool area and backyard. Everything feels brighter and more inviting.
A Deck with a New Purpose
This wasn’t just a visual upgrade. It was a full-function boost. The deck is now safe, solid, and built to last. It’s ready for pool parties, family gatherings, or a quiet evening outside.
A simple color shift, a better design, and safer materials made all the difference. The before-and-after says it all. This isn’t the same deck — it’s a brand-new space with a brand-new purpose.
Want a Deck Rehab Like This? Start Here
Not every deck Rehab project needs a full teardown. Sometimes, a small change makes a big impact. Maybe it’s new stairs. Maybe it’s a railing upgrade. We work with what you have and help you get more from it.
We Handle Every Step
You don’t need to guess your way through a deck rehab project. We take care of it all.
- Planning and layout
- Code and permit checks
- Building and finishing
- Clean-up and final walk-through
You get clear updates and a simple process from start to finish.
Let’s Do Something New
We design decks that feel safe, look great, and work better every day. One team. One clear plan. One finished deck you’ll be proud of.
Let’s talk about what your space could become.
Let’s Build Something Solid Together
Every deck we build follows the same promise. No shortcuts. No guesswork. Just careful planning, clean work, and results that last. We follow the code. We keep you informed. And we deliver what we promise.
If you’re thinking about a deck rehab project or want to improve your outdoor space, we’re here to help. Whether it’s a small upgrade or a full refresh, we’ll guide you through each step.
Visit our website to see more of our work. Or contact us today for a free quote on your deck rehab project. We’ll listen, plan, and build a space you’ll enjoy for years.
One Clearwater Construction. Built clean. Built right. Built for you.